
The Portal Administrator can manage user privileges for their organization’s account by establishing user permission to read, write, and/or submit records. The Administrator role defaults to the person who first registered the organization on the Portal, but this person can assign Administrator privileges to another user.
The Portal Administrator is encouraged to periodically review users and their permissions to ensure they are accurate. As employees and representatives join or leave the organization, their permissions should be established or revoked.
On this page
Inviting a new user
The Portal Administrator may invite a new user to have access to the organization’s account. To invite a new user:
- Select “Administration” from the left-hand navigation panel, then select “Invite a new user” from the drop-down list.
- On the Invite a new user page, choose your registered organization from the drop-down list and click on “Select”.
- Enter the email address, first name, and last name of the person you wish to invite.
The invitation is sent via a system-generated email. Once the individual accepts the invitation, you will receive a system-generated email notifying you of the response and reminding you to assign user privileges by following the Managing user privileges instructions.
Managing user requests
The Portal Administrator may receive a system-generated email from someone requesting user privileges for the organization’s account. If you receive a request:
- Select “Administration” from the left-hand navigation panel, then select “Manage user requests” from the drop-down list.
- Select the user (person who sent the request) from the table provided and select the “Approve” or “Reject” button to set a decision on the request.
The person who sent the request will receive a system-generated email notifying them of your decision. If you approve the new user, ensure to assign user privileges by following the Managing user privileges instructions.
If you are expecting to receive a user request but it does not arrive, please check your junk email.
Managing user privileges
The Portal Administrator may assign user permissions to read, write, and/or submit records. A description of each of the permission types is provided in the Information box.
To manage user privileges:
- Select “Administration” from the left-hand navigation panel, then select “Manage user privileges” from the drop-down list.
- On the Manage user privileges page, choose your registered organization from the drop-down list and select “Select”.
- In the User table, select the appropriate level of permissions for each user using the drop-down lists. Once updates are completed, select “Submit”.
If the permission was successfully updated, a green box with a checkmark will appear.
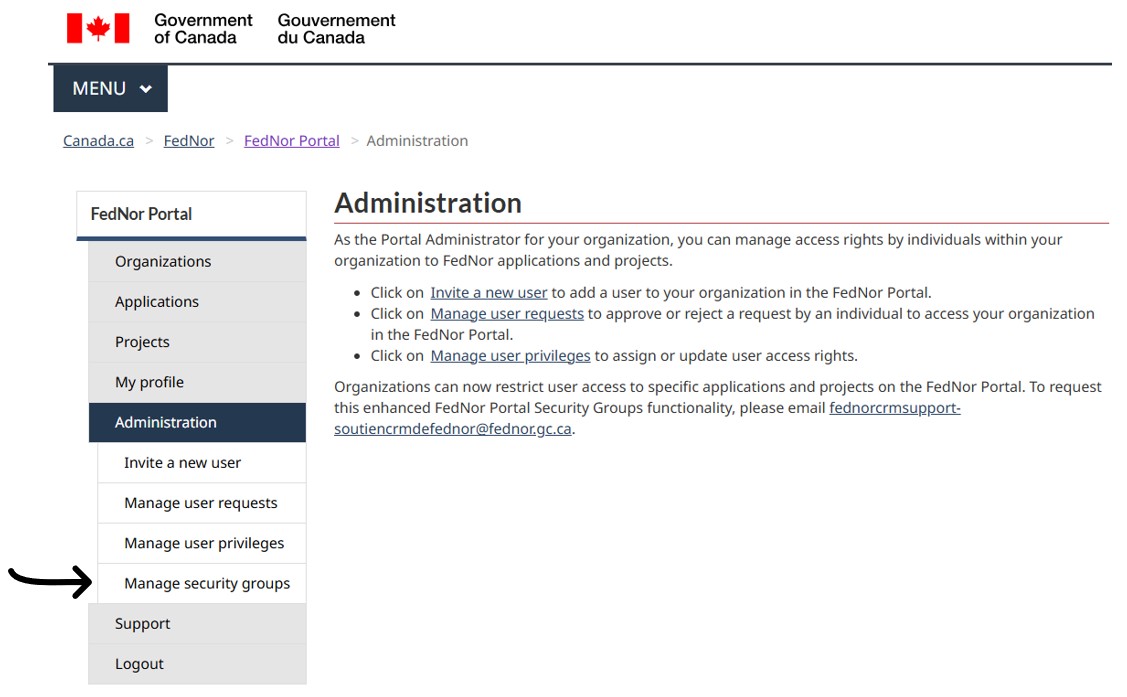
Managing security groups
The Manage security groups feature is designed to restrict portal user access to designated applications and projects. This feature is essential for large organizations with diverse stakeholder groups, as well as those managing proprietary projects that require controlled access to information. A Portal Administrator can request access to the FedNor Portal security groups function by sending an email to fednorcrmsupport-soutiencrmdefednor@fednor.gc.ca.
The Manage security groups feature is administered by a Portal Administrator and requires continuous oversight of user access across all current and future applications and projects.
To create and manage security groups:
- Select ‘Administration’ from the left-hand navigation panel, then select ‘Manage security groups’ from the drop-down list.
- On the Manage security groups page, choose your registered organization from the drop-down list and select ‘Select’.
Creating a new security group:
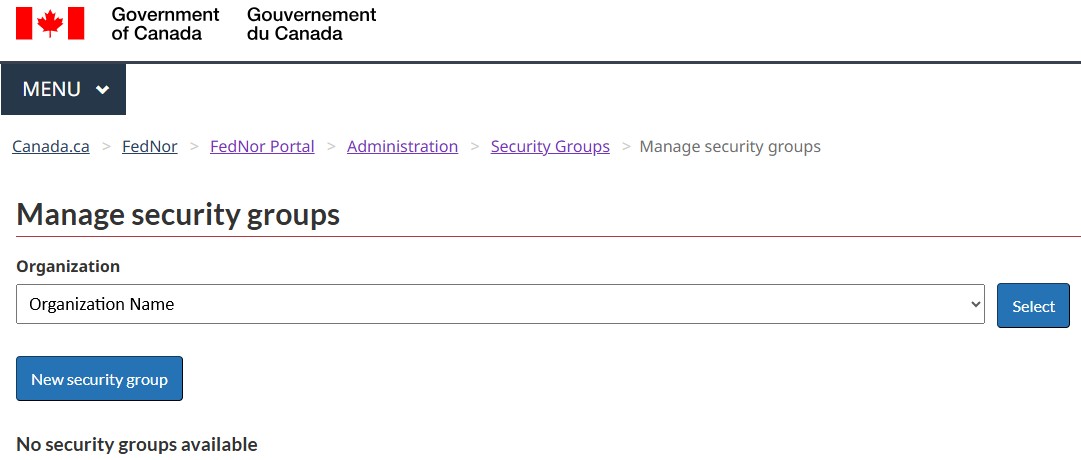
- Select the ‘New security group’ button.
- Complete the Security group name field with a name that best describes the group of users (i.e. Department of Science and Engineering; Research and Development team).
- Add a brief description of the security group.
- Once the fields are completed, select “Save”. Select ‘Close’ to return to the Manage security groups page.
Configuring and updating a security group:
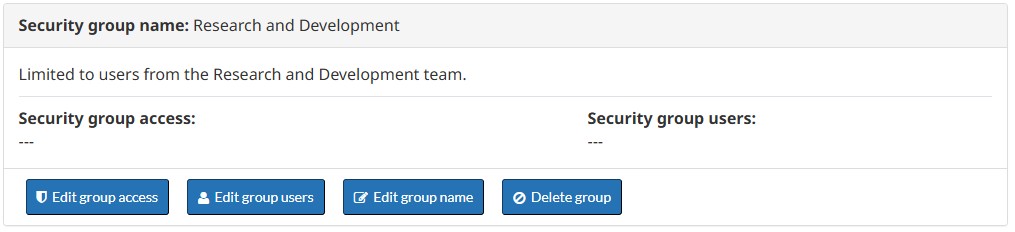
From the Manage security groups page, locate the security group that requires configuration or updates. The Portal Administrator can then assign one or more users to specific applications and projects by using the following options:
Edit group access:
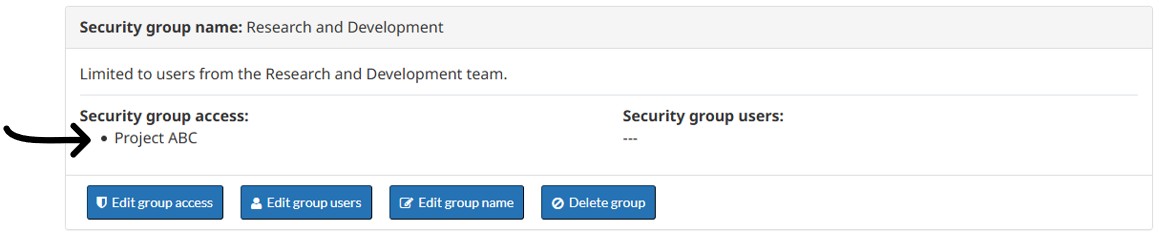
The Security group access page allows the Portal Administrator to select one or more applications and projects that will be accessible only to the users assigned to the security group.
To set or update access, select the ‘Edit group access’ button to open the Edit group access page. In the Security group access section, click in the ‘Select applications and projects that will be restricted to the security group’ field to view the list of applications and projects available on the organization’s FedNor Portal.

From the drop-down menu, select the desired application and project. Add additional applications and projects as needed. Once the list is complete, select ‘Add’.
The selected applications and projects will be listed in the Security group access table. Select ‘Save’ to apply the updates. You can update the list at any time by using the ‘Delete’ action to remove an application or project, or by using the ‘Add’ function to include additional items in the security group.
In the example provided, an application called Project ABC was added to the list of applications and projects available to the security group.
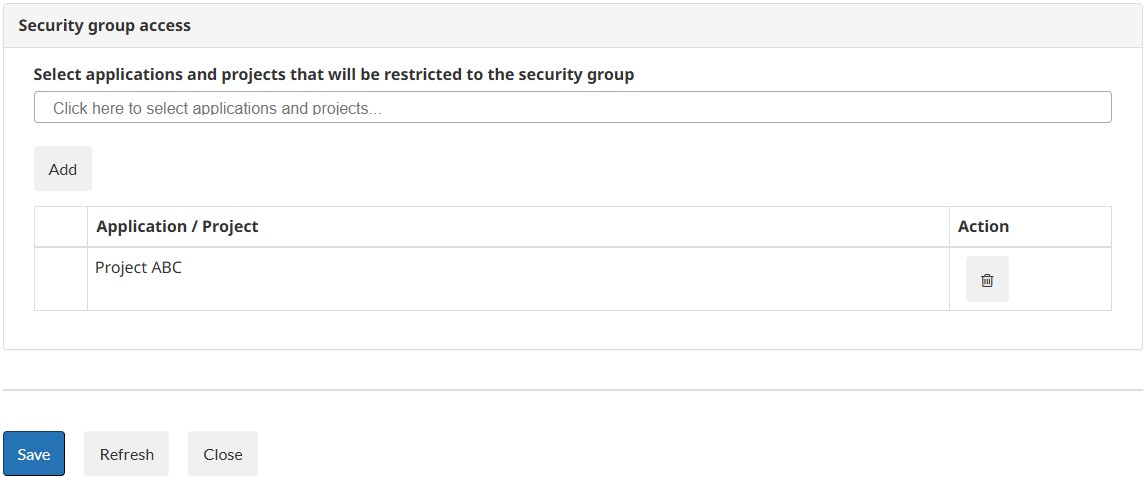
When the final change is saved, select ‘Close’ to return to the Manage security groups page. On the Manage security groups page, the security group will be updated to highlight the applications and projects that are limited to the security group.
Important considerations
- Applications and projects can be assigned to one or more security groups.
- The Portal Administrator will be advised by email following the submission of a new application.
- Newly created applications are accessible to all portal users until they are assigned to a specific security group.
Edit group users:
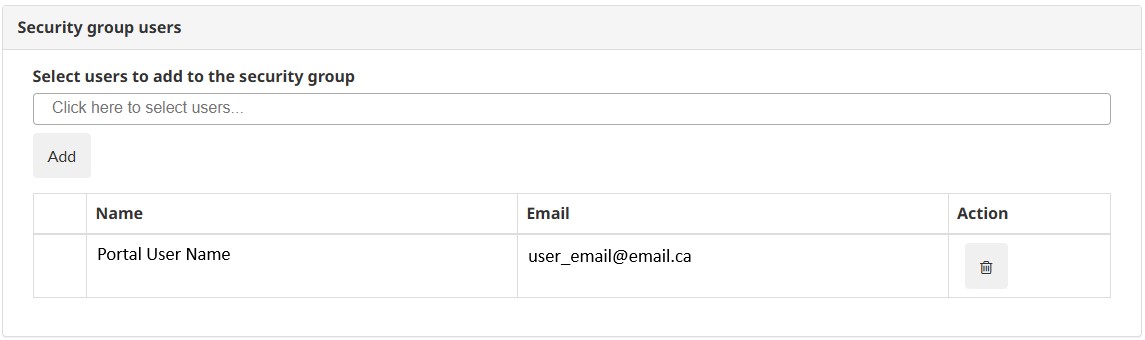
The Edit group users page enables the Portal Administrator to assign users to a security group.
Select the ‘Edit group users’ button to open the Edit group users page. In the Security group users section, click in the ‘Select users to add to the security group’ field to access the list of users who have access to your organization on the FedNor Portal.
From the drop-down menu, select a user, and continue adding users as needed. Once the list is complete, select ‘Add’. Note: If a user does not appear in the list, it may be because they have not been invited to access your organization on the FedNor Portal or they have not yet redeemed their portal invitation. Refer to Inviting a new user for further instructions.
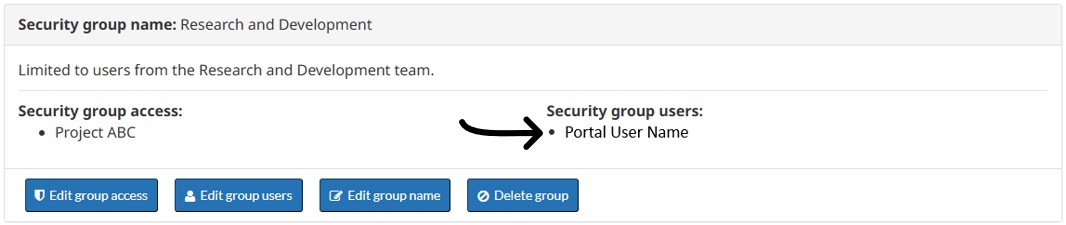
Once users are added, they will appear in the Security group users table. Select ‘Save’ to apply the updates. You can update the list at any time by using the ‘Delete’ action to remove a user or the ‘Add’ feature to include additional users in the security group.
When the final changes have been saved, select ‘Close’ to return to the Manage security groups page. On this page, the security group will be updated to highlight the users assigned to the security group.
Important considerations
- Users may be assigned to one or more security groups.
- The Portal Administrator is advised by email when a new user redeems a portal invite.
- New users must be assigned to a security group to access relevant applications and projects.
- The Portal Administrator should be included in all security groups to ensure full visibility of all applications and projects.
Edit group name:
The Edit group name page allows the Portal Administrator to update the name and description of a security group.
- Select the ‘Edit group name’ button to open the Edit group name page. In the Security group section, update the Security group name field with a name that clearly identifies the group of users (i.e. Department of Science and Engineering; Research and Development team).
- Update the Security group description field to include a brief description that facilitates easy identification and retrieval of the group.
- Once the fields are completed, select ‘Save’, then select ‘Close’ to return to the Manage security groups page.
Delete group:
Use the Delete group option to remove an existing security group. Once deleted, the associated applications and projects will become accessible to all users, unless they are assigned to another security group.